LLaMA系列模型浅析

这篇博客主要记录博主在探索meta开源的llama大模型,包括它的数据,training代码以及评测方法。之所以想记录下来,主要是因为llama的论文写的极其的细致,完美践行了开源这个词(感谢meta!),第二个原因是它的文档以及社区都很活跃,使用人群广泛,我们可以借助很多中文社区的复现情况去一探大公司在实现一个大模型时候的考量,以及思考它为什么会这样做。

之前写过一篇关于斯坦福的alpaca的代码的解析,后来看过很多关于微调大模型(supervised finetuning)的代码仓库,大家的实现思路基本上都可以追溯到alpaca的这份代码。

首先我会将所有我参考的资料罗列在前面,方便大家查找: - llama代码仓库 这个仓库是介绍如何下载llama模型 - llama "食谱" 一开始我想在上一个llama仓库中找到相关的train代码,找了半天发现根本没有。后来才发现meta官方将所有finetune(pretrain from scrach)的代码放在这个仓库,适合developer - Llama 2: Open Foundation and Fine-Tuned Chat Models llama2的research paper。强烈建议食用

中文社区的LLama的工作 - Chinese LLaMA Alpaca2

这个仓库同样有配套的文章Efficient and Effective Text Encoding for Chinese LLaMA and Alpaca

这个仓库的工作主要是两个:

  1. 扩充了llama原来的token,也就是中文的那部分
  2. 用新的中文数据在llama上进行了continue pretraining,并且发布了在instruction数据上的微调模型

研究思路很简单,在别人模型上继续预训练,并参照alpaca对预训练的模型进行instruction finetune让其具备follow instructions的能力。我们首先从这个Chinese LLaMA代码仓库看起。

Chinese LLaMA

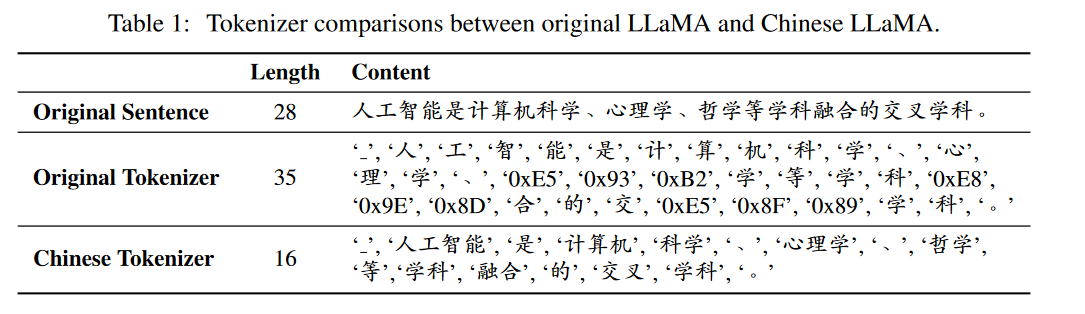
作者自述做这份工作的原因是原生llama模型的词汇表中仅包含1000+个中文字符,所以首要任务是要扩充llama的词表。他们首先训练了一个中文的tokenizer,然后将其与llama的tokenizer进行融合,融合后的tokenizer拥有49953个token, 那么输入的词汇表数就从32000扩充到了49953。作者的实验还发现用新的融合后的tokenizer去tokenize序列要比旧的tokenizer编码后的序列要短。那很自然的就减少了很多计算量。

image-20231212161342629

在准备好tokenizer之后就到了训练环节,作者在这里没有采用全参数微调而是采用了Lora这种高效微调的方式。其实我看到这里是有疑问的,当然作者也在issue中做了回答:

image-20231212162349967

我个人认为continue pretraining是需要全参数微调的,而且还是在扩充了词表的情况下。

预训练脚本,这个脚本是作者在transformers库的run_clm.py上修改的,至于中文预训练数据部分,作者采用了20G的纯文本数据,并将他们分成了每个block 512个token。我们来看看代码是怎么写的,源代码在run_clm_pt_with_peft,可以先将Chinese-LLaMA-Alpaca-2拉到本地,在文件姐scripts里可以看到training文件夹里有两个训练代码,一个是pretrain的,一个是sft的。我们先看前面这个pretrain的,它的训练任务很好理解,就是用decoder这种模型架构训练一个输入序列的下一个单词。

作者在这个仓库里没有放训练数据,我们先在该仓库里创建一个./data,里面放一些txt格式的数据用于测试,比如一些小说啥的,训练脚本在处理数据时会自动对他们进行读取并chunk成512长度的序列。作者在paper里提到的他们team训练的tokenizer也一并在scripts的tokenizer文件夹内,要跑通train这个代码需要在run_pt.sh内将这些参数都制定好。

先来看load数据以及处理部分的重点代码:

1
2
3
4
5
6
7
8
9
10
11
12
13
14
15
16
17
18
19
20
21
22
23
24
25
26
27
28
29
30
31
32
33
34
35
36
37
38
39
40
files = [file.name for file in path.glob("*.txt")]
for idx, file in enumerate(files):# files为./data文件夹内所有的txt
data_file = os.path.join(path, file)
filename = ''.join(file.split(".")[:-1])
cache_path = os.path.join(data_args.data_cache_dir, filename+f"_{block_size}")
os.makedirs(cache_path, exist_ok=True)
try:
processed_dataset = datasets.load_from_disk(cache_path, keep_in_memory=False) # 首先使用datasets导入
logger.info(f'training datasets-{filename} has been loaded from disk')
except Exception:
cache_dir = os.path.join(data_args.data_cache_dir, filename+f"_text_{block_size}")
os.makedirs(cache_dir, exist_ok=True)
raw_dataset = load_dataset("text", data_files=data_file, cache_dir=cache_dir, keep_in_memory=False)
logger.info(f"{file} has been loaded")
tokenized_dataset = raw_dataset.map(
tokenize_function,
batched=True,
num_proc=data_args.preprocessing_num_workers,
remove_columns="text",
load_from_cache_file=True,
keep_in_memory=False,
cache_file_names = {k: os.path.join(cache_dir, 'tokenized.arrow') for k in raw_dataset},
desc="Running tokenizer on dataset",
)
grouped_datasets = tokenized_dataset.map(
group_texts,
batched=True,
num_proc=data_args.preprocessing_num_workers,
load_from_cache_file=True,
keep_in_memory=False,
cache_file_names = {k: os.path.join(cache_dir, 'grouped.arrow') for k in tokenized_dataset},
desc=f"Grouping texts in chunks of {block_size}",
) #
processed_dataset = grouped_datasets
processed_dataset.save_to_disk(cache_path)
if idx == 0: #
lm_datasets = processed_dataset['train']
else: # 如果有多于2个txt,那么将这些数据叠加起来
assert lm_datasets.features.type == processed_dataset["train"].features.type
lm_datasets = concatenate_datasets([lm_datasets, processed_dataset["train"]])

内有两个帮助函数:

1
2
3
4
5
6
7
8
9
10
11
12
13
14
15
16
17
18
19
20
21
22
23
24
25
26
27
def tokenize_function(examples):
with CaptureLogger(tok_logger) as cl:
output = tokenizer(examples["text"]) # 仅仅做了tokenize这一个动作,而且会在每一个序列的结尾都加上EOS,由于设置了tokenizer.add_eos_token = True
# clm input could be much much longer than block_size
if "Token indices sequence length is longer than the" in cl.out:
tok_logger.warning(
"^^^^^^^^^^^^^^^^ Please ignore the warning above - this long input will be chunked into smaller bits"
" before being passed to the model."
)
return output

# Main data processing function that will concatenate all texts from our dataset and generate chunks of block_size.
def group_texts(examples): # 在这个函数里程序将tokenize之后的input_ids和attention_mask进行chunk,保证每个chunk大小都是block_size的
# Concatenate all texts.
concatenated_examples = {k: list(chain(*examples[k])) for k in examples.keys()}
total_length = len(concatenated_examples[list(examples.keys())[0]])
# We drop the small remainder, we could add padding if the model supported it instead of this drop, you can
# customize this part to your needs.
if total_length >= block_size:
total_length = (total_length // block_size) * block_size
# Split by chunks of max_len.
result = {
k: [t[i : i + block_size] for i in range(0, total_length, block_size)]
for k, t in concatenated_examples.items()
}
result["labels"] = result["input_ids"].copy() # 这里labels设置成和input_ids一模一样
return result

可以看到基本采用transformer的库来实现的数据的导入以及process,总体来说使用datasets还是比较方便的。

再来看如何做的lora train:

1
2
3
4
5
6
7
8
9
10
11
12
13
14
15
16
17
18
19
20
21
22
23
24
25
26
from peft import LoraConfig, TaskType, get_peft_model, PeftModel, get_peft_model_state_dict
if not training_args.full_finetuning: # 默认模型是全参数微调
if training_args.peft_path is not None:
logger.info("Peft from pre-trained model")
model = PeftModel.from_pretrained(model, training_args.peft_path, device_map=device_map)
else:
logger.info("Init new peft model")
target_modules = training_args.trainable.split(',')
modules_to_save = training_args.modules_to_save
if modules_to_save is not None:
modules_to_save = modules_to_save.split(',')
lora_rank = training_args.lora_rank
lora_dropout = training_args.lora_dropout
lora_alpha = training_args.lora_alpha
logger.info(f"target_modules: {target_modules}")
logger.info(f"lora_rank: {lora_rank}")
peft_config = LoraConfig(
task_type=TaskType.CAUSAL_LM,
target_modules=target_modules,
inference_mode=False,
r=lora_rank, lora_alpha=lora_alpha,
lora_dropout=lora_dropout,
modules_to_save=modules_to_save) # LoraConfig是PEFT这个包内的
model = get_peft_model(model, peft_config)
model.print_trainable_parameters()

该仓库的instruction finetune的代码和alpaca的思路一样,很多写法都一模一样。不过因为作者在做pretrain的时候用的是lora的形式,所以在sft的时候也需要在这个基础模型上进行微调。作者在run_clm_sft_with_peft.py中是类似于pt脚本中的写法:

1
2
3
if training_args.peft_path is not None:
logger.info("Peft from pre-trained model")
model = PeftModel.from_pretrained(model, training_args.peft_path, device_map=device_map)

这里的peft_path是需要在train的时候传入参数的,也就是我们在pretrain时候通过call_back函数保存的lora参数, 模型组装好之后训练。博主认为这时候是所有参数一起调整了,包含lora部分以及llama2基础模型部分。

一点题外话:在阅读Chinese LLaMA这份代码的时候发现了其中一个作者崔一鸣的博客,内有一个关于大模型的纵览介绍挺适合初学者熟悉大模型的相关技术,也适合面试的盆友回顾以及对自己还没掌握透的知识进行查漏补缺的。[Methods and Practices for Large Pre-trained Language Models](https://ymcui.com/talk/20230826_baai_llm_tutorial.pdf)

建议配合stateofgpt食用

LLaMA

拓展补充介绍

LLaMA的1和2版本在模型架构上大多数相似,其中三个关键技术使羊驼模型区别于其他模型,这里摘一下llama2 research paper中的描述:

image-20231213162604171

RMSNorm

在介绍RMSNorm之前补充一下Batch Normalization以及Layer Normalization

参考:

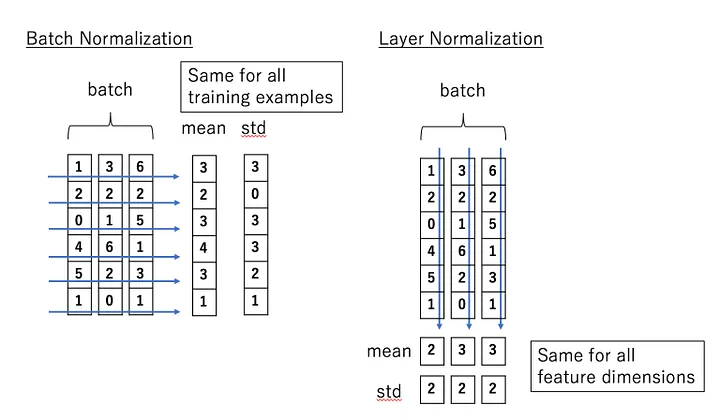
上面图片中,每一行属于一个batch的数据,不用管这个batch内的数据是2维的还是1维的。

Batch Normalization

for each dimension of the input, all data points in the batch are gathered and normalized with the same mean and standard deviation

BN的所有计算都在一个batch以内,也就是我们用到的数据只是这个batch内的数据,不会涉及到其他batch的数据

image-20231214093939577

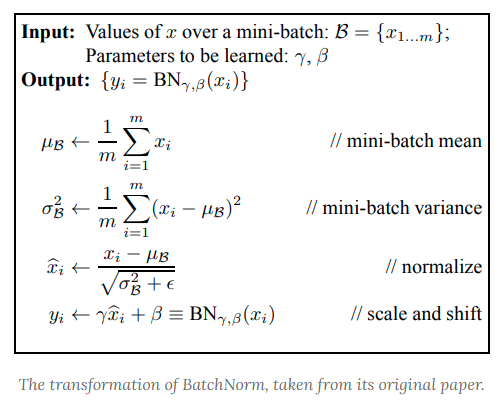
上面的伪代码中的x可以是一个向量,如果是向量的情况下涉及到的x的相加都是向量的运算。值得注意的是在卷积层里,dimension指的是channel维度的

image-20231214094523587

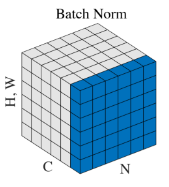
也就是不同channel计算出的μ和σ是不同的。

the input data is normalized separately for each channel in a convolutional layer.

而在全连接层,dimension就是指feature维度。

Layer Normalization

with LayerNorm, we normalize each data point separately. Moreover, each data point’s mean and variance are shared over all hidden units (i.e. neurons) of the layer

跟batch没关系,在layer层面去计算均值和方差。比如在全连接层,输入是125个神经元的话,就对这些神经元进行归一化。也就是数据中的每一个data points都是独立进行归一化的,和其他data points无关。那么对于卷积层来说的话就有两种计算方式:参考

image-20231214100917596

看pytorch的doc多采取前一种全部一股脑求平均和方差的方式。

RMSNorm

RMSNorm的research paper写着一部分写的特别清楚,推荐查看原文Root Mean Square Layer Normalization

image-20231214103540564

RMSNorm去除了LN的求平均数的过程,并且将LN中的除以方差变成了除以root mean square。来看llama中的代码实现:llama/llama/model.py

1
2
3
4
5
6
7
8
9
10
11
12
13
14
def _norm(self, x):
"""
Apply the RMSNorm normalization to the input tensor.

Args:
x (torch.Tensor): The input tensor.

Returns:
torch.Tensor: The normalized tensor.

"""
return x * torch.rsqrt(x.pow(2).mean(-1, keepdim=True) + self.eps) # eps防止除以0


SwiGLU

阅读知乎这篇博客大模型基础|激活函数|从ReLU 到SwiGLU

Rotary Embedding, RoPE

Attention is All you need中的position embedding

首先回顾下在Attention is all you need原文paper中对于位置编码的公式:

image-20231215135557606

我一开始理解这两个公式的时候很困难,后来查了一些资料,发现很多人也在这里由一些困惑,包括tensorflow官方的实现方式位置编码,tensorflow的官方给出的代码是:

1
2
3
4
5
6
7
8
9
10
11
12
13
14
15
16
17
def get_angles(pos, i, d_model):
angle_rates = 1 / np.power(10000, (2 * (i//2)) / np.float32(d_model))
return pos * angle_rates
def positional_encoding(position, d_model):
angle_rads = get_angles(np.arange(position)[:, np.newaxis],
np.arange(d_model)[np.newaxis, :],
d_model)

# 将 sin 应用于数组中的偶数索引(indices);2i
angle_rads[:, 0::2] = np.sin(angle_rads[:, 0::2]) # 不懂双冒号切片的可参考: https://stackoverflow.com/questions/3453085/what-is-double-colon-in-python-when-subscripting-sequences

# 将 cos 应用于数组中的奇数索引;2i+1
angle_rads[:, 1::2] = np.cos(angle_rads[:, 1::2])

pos_encoding = angle_rads[np.newaxis, ...]

return tf.cast(pos_encoding, dtype=tf.float32)

get_angles方法里10000的指数系数中tensorflow的实现多加了一个i//2。这里我非常困惑,后来发现stackflow上也有同样的发问:

推荐阅读一下A Gentle Introduction to Positional Encoding in Transformer Models, Part 1。该作者的实现方式更符合人类的理解方式:

1
2
3
4
5
6
7
8
9
10
11
12
13
import matplotlib.pyplot as plt

def getPositionEncoding(seq_len, d, n=10000):
P = np.zeros((seq_len, d))
for k in range(seq_len):
for i in np.arange(int(d/2)): # 这里只循环d//2次
denominator = np.power(n, 2*i/d)
P[k, 2*i] = np.sin(k/denominator)
P[k, 2*i+1] = np.cos(k/denominator)
return P

P = getPositionEncoding(seq_len=4, d=4, n=100)
print(P)

那么该怎么理解paper中的公式以及tensorflow//2的这个实现呢。就拿某一个sequence中的token来举例子,如果我们想要编码的向量长度是20,也就是d=20。那么tensorflow的做法是首先创建一个长度为20的向量,然后依次求其中的值。

1
2
3
4
5
该token的position encoding所有应该求值得index
[0, 1, 2, 3, 4, 5, 6, 7, 8, 9, 10, 11, 12, 13, 14, 15, 16, 17, 18, 19]
angle_rates = 1 / np.power(10000, (2 * (i//2)) / np.float32(d_model)) 这句话
10000的指数(2 * (i//2))是
[0, 0, 2, 2, 4, 4, 6, 6, 8, 8, 10, 10, 12, 12, 14, 14, 16, 16, 18, 18]

所以对照paper中的公式表达的意思就是:

在向量的偶数index位置,比如0,2...等,公式里的2i就等于它的index

在向量的奇数index位置,比如1,3...等,公式里的10000的指数也就是2i的位置应该取这个奇数的前一个偶数值。

那么我们来看看tensorflow的这份代码就对上了:

10000的指数部分出现的值为: [0, 0, 2, 2, 4, 4, 6, 6, 8, 8, 10, 10, 12, 12, 14, 14, 16, 16, 18, 18]

所以paper里的这个公式要将2i当作一个整体来看。

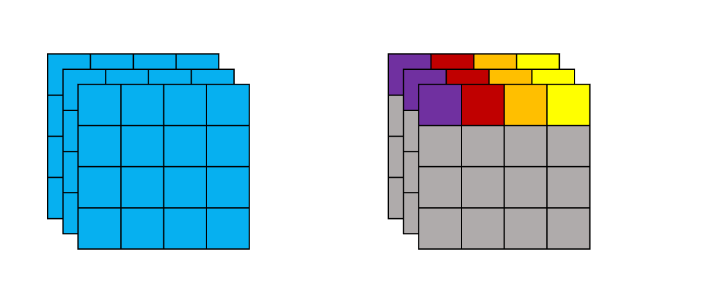
RoPE(rotary Position Embedding)

image-20231215152735803

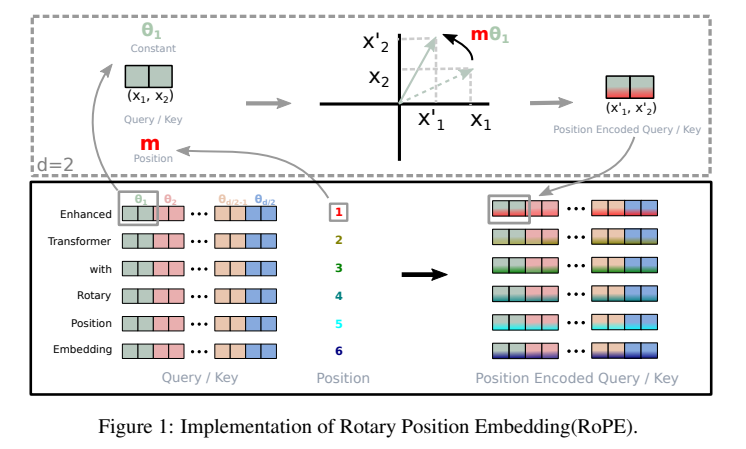
RoPE进一步改进了绝对位置编码,是一种在transformer attention中的Q和K上添加相对位置信息的方法

image-20231215152803294

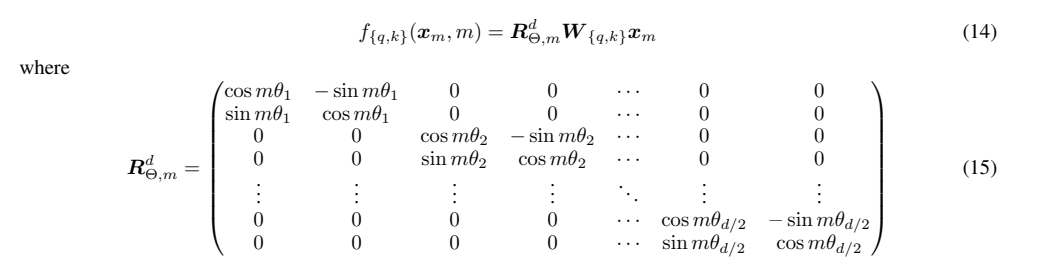
首先作者将隐藏层的向量每两个维度编成一组,看成2维的向量;然后对于特定位置m的x1,x2,将他们旋转mθ角度,用新的x1,x2值替换老的值加入到query和key中。

Grouped-Query Attention (GQA)

GQA是llama2相较于llama1新采用的技术,它是一种提升推理速度的方法,主要针对多头注意力机制进行改进,与KV Cache搭配使用