3DGS中mask的处理
今年一整年在做NVS,也就是3D场景渲染的工作。在这个topic上风头最盛的是3DGS,其中有一个task是:
如果一个场景里有前景(foreground)和背景(background),能否单独对前景或者后景进行渲染。类似的需求描述可以参考3DGS官方repo中有几个issue:
- https://github.com/graphdeco-inria/gaussian-splatting/issues/282,https://github.com/graphdeco-inria/gaussian-splatting/issues/127
- https://github.com/graphdeco-inria/gaussian-splatting/issues/761
282这个issue是想把一个场景中动态的东西去掉,比如一个城市场景中飞驰的汽车。761这个issue就只是想把前景分割出来,背景不要:
- https://github.com/graphdeco-inria/gaussian-splatting/pull/1193
- https://github.com/graphdeco-inria/gaussian-splatting/issues/64
我这篇博客主要用来记录我在这方面的一些尝试实验和观察。
127这个issue内有一位id为yzslab的网友给出了自己的解决方案,大家可以移步参考add dynamic mask, 它在原有的3DGS的代码上加了一个mask的导入,原理我后面再分析。
这里我先记录前景场景的尝试。我的数据集是一个打篮球的场景,一共八个机位,每一个机位拍摄了一张静态图片,我拿来做3D场景构建的是同一个时刻下八个机位的静态图片。
Foreground
首先我是用sam2对8个机位的图片中的运动员进行了分割,我使用的是动态交互的UI来做的,会更精细一点。需要的朋友可以参考我基于别人代码的实现:https://github.com/applepieiris/sam2-playground,我在代码里添加了将三个mask结果一并展示(附带预测置信度评分),可以在页面上选择自己最满意的mask进行点击保存。之所以想添加这个功能,是因为我发现有时候SAM2 score最高的那个mask反而不是最精确的,所以想在界面上进行展示后再选,在使用SAM2对运动员进行分割的时候,我是一个一个进行分割的,也就是先用矩形框出运动员,再点选,sam2.1是支持两者结合的方式进行Prompt,如果有多个运动员,需要一个一个来,之所以没有选择一起,是因为sam2.1不支持多个box+point的组合,只能支持一个box+多个点,但总体来说还是分割的蛮精细的。另外我还在这个代码里添加了将结果merge成最终mask的功能,欢迎参考。
这里我对每一张图片不仅产生了0-1的mask,也产生了针对mask的RGBA图片,也就是alpha通道存储的是mask信息。
这里我用的3DGS的原生代码
对于images来说,3DGS需要的是colmap格式的输入,它的代码仓库里提供了将images转化为colmap的脚本convert.py,其实脚本里就是几条colmap命令,注意:这里我想得到运动员单独的3D场景,一共有两个实现路径,一个是给3DGS输入RGBA的图片,一个就是还是RGB图片,但是可以借鉴127
issue内这个代码的实现,手动传入mask。
RGBA作为输入
我先说我传入RGBA图片,我的输入是8张RGBA图片,用convert.py会再相应路径下产生相机位姿信息,存储在sparse文件夹下面,这个文件夹内的内容在train.py中会进行读取。结果是不错的,可以渲染出单独运动员的场景,我们来看original repo中如何处理RGBA图片的:
在train.py中,作者对预测的image乘以了alpha_mask,然后对乘以alpha_mask之后的image和original_image做了loss的计算,再来看original_image,重点看utils/camera_utils.py
1 | def PILtoTorch(pil_image, resolution): |
可以看到对于original
image并没有做alpha_mask的乘积,这里我也是觉得很奇怪,我觉得应该在resize之前就做乘积,也就是只需要对alpha_mask中为1的pixel做loss的更新,所以我又去查找了一下,其中1193
issue
提到了这个问题,这个issue对PILtoTorch进行了修改:
1 | def PILtoTorch(pil_image, resolution): |
这样修改的原因在于,在原来的代码里,如果不传入-r参数,也就是不对图片进行缩放,那么alpha_mask就是原来的0-1值,这部分是合理的,但是GT image并没有被mask,所以在计算loss的时候只有预测image进行了mask,而对GT并没有进行mask。
而一旦图片被resize,PIL中resize这个函数,会对alpha mask也进行插值,所以原来0-1值的mask会变成浮点数的mask,而PIL在resize的时候会首先对RGB进行mask,然后再插值缩放。
我们来看看没有修改前,传入RGBA图片的最终渲染效果:
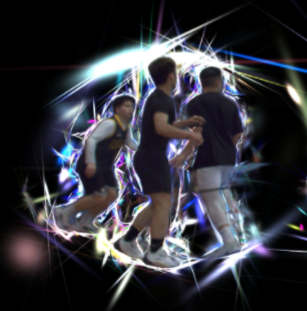
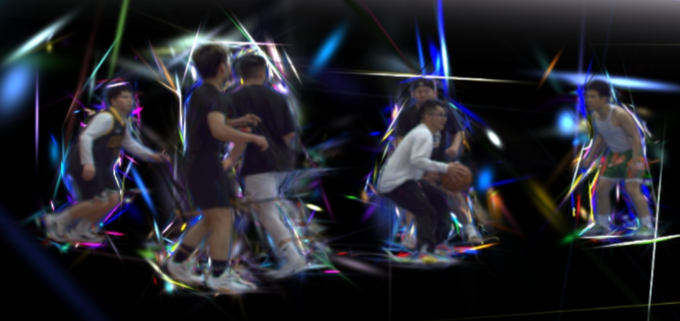
可以看到光斑明显。再看修改后的结果:
优化很明显了。
单独的mask作为输入
这里我也测试了127 issue内这个代码的实现,手动传入mask,注意,我理解这里输入给3DGS的image是完整的RGB图片,而不是上面制作的RGBA图片了,另外需要在数据集内维护好一个./mask文件夹,用于存储每一张图片的0-1mask。
结果如上图,发现noise是比较多的,特别是运动员的轮廓处。跟上面传RGBA的图片,没修改代码之前是一样的。
可以理解作者yzslab在修改这部分代码时,是想解决去掉一个场景里动的那部分object,仔细看它的代码,发现它的主要思路是对mask部分的像素,直接将GT Image和prediction Image变成一样的,这样在loss部分这部分就不参与了loss。可以参加核心修改:
1 | mask = viewpoint_cam.is_masked |
Background
在background这个task上,我先阐述一下目标,跟127 issue里的目标是一样的:
I have a video of an indoor scene with an object bouncing around it but I want to mask away the object. How is this possible?
I have the segmentation masks for it. I saw #101 that mentioned to append an A channel where the 0 means the pixel should not be rendered but I had some questions about that.
Will it still work if in some frames, parts of my scene are blocked by the object but are again visible in future frames if I mask this way?
My goal is the get a fully fleshed 3D representation of the scene minus the object
target是: 得到一个移除object的干净背景的scene,对于我的场景,我就是想得到一个干净的篮球场的场景,远动员不要出现,至于被运动员的pixel挡住的部分,理想情况下这些pixel需要被填补或者用其他视角的颜色来推理。
单独的mask作为输入
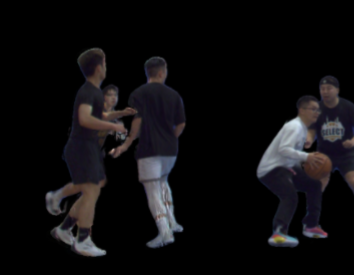
这里我们还采用127 issue里的方法,传入的images图片是完整的RGB图像,masks内放入0-1的mask,结果:
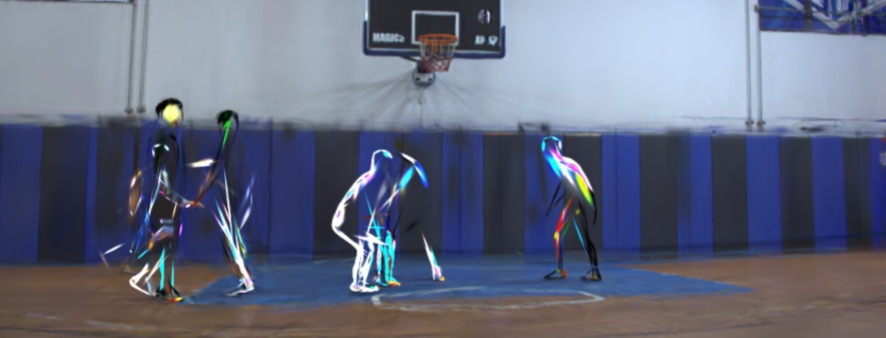
可以看到这部分一定程度上实现了我们想要的目标,在某些角度,确实人变成了“透明的”,可以看到背后的背景的颜色,但这个结果只能说是差强人意。