0%

今天新开一篇文章。前段时间一直忙于项目周期中琐碎的事情,没有好好总结和思考技术核心的东西。探索RAG的应用也有一段时间了,市面上的应用也看的不少,很多的应用包括langchain-chatchat,Dify, 都是整体搭建了一个最basic版本的RAG框架,至于很多细节点,并没有提供更精细化的实现,今天要写的这部分:PDF上传到知识库之后如何parse和chunking,直接影响后续retrival的表现,目前还没有很全面的review来总结这部分内容。这里就对我看到的一些技术做一些整理。

解析PDF文档的难点主要在于如何精确地捕捉页面的整体布局,并将包括表格标题, 段落以及图片在内的内容转译为文档的文字形式。这一过程涉及到多个技术点,布局的检测,图片中文字的抽取,表格中行与列的识别(如何正确将PDF中的表格识别成可用结构化形式表示的表格,也就是能还原出原表格来)。

目前解析PDF文档主要有三种主流方式:

  1. 基于规则的方法:这种方法根据文档的组织特性来确定每个部分的样式和内容,代表库:pypdf, 这种方法的适用性比较差,很难通过预设的规则覆盖所有PDF的情形。
  2. 基于深度学习模型的方法:一个流行的解决方案是结合了物体检测和OCR模型,代表 Chatdoc
  3. 基于多模态大模型的方法:通过这种方法可以解析PDF中复杂结构或者提取关键信息
Read more »

这篇博客主要记录Transformer架构的代码实现。以下是参考资料 - Attention is All you need - Attention? Attention! - lilian wen的tensorflow版本的实现 - illustrated-transformer 强烈建议看illustrated transformer这篇博客,是跟paper介绍的transformer架构完全对齐的 - pytorch transformer实现

​ 这是pytorch的官方实现

​ 斯坦福出的transformer架构的实现tutorial

我自己想实现的一遍的原因在于:

  1. transformer的文章读了很多遍,但是很多细节还是没有去深究。
  2. 斯坦福的实现完全遵照的是paper的架构,但是我觉得还是实现的过于复杂了,我想遵循lilian的tensorflow实现把原生的tranformer架构实现一下
  3. 我对pytorch的掌握没有tensorflow好,感觉现在pytorch基本上成为深度学习网络的主流,特别是大模型出来之后,hugginggface的transformer库也是支持pytorch更好一点,更大的社区。(此时有点后悔当时系统学习的是tensorflow而不是pytorch)

transformer的整体架构: encoder-decoder两大模块,encoder模块内有重复的6个子模块,decoder模块内也有重复的6个子模块。

Transformer model

我们采用自上而下的方式来看这两个模块

Transformer整体架构

1
2
3
4
5
6
7
8
9
10
11
12
13
14
15
16
17
18
19
20
21
22
23
24
25
26
27
28
29
30
31
32
33
34
35
36
37
38
39
40
41
42
43
44
45
46
47
48
class Transformer(nn.Module):
'''
define the whole architecture of Transformer in:
Vaswani et al. Attention is All You Need. NIPS 2017.
'''
def __init__(self, num_heads=8, d_model=512, d_ff=2048, num_enc_layers=6, num_dec_layers=6,
drop_rate=0.1, warmup_steps=400, pos_encoding_type='sinusoid',
ls_epsilon=0.1, use_label_smoothing=True,
model_name='transformer', tf_sess_config=None, **kwargs):
super().__init__()
self.h = num_heads
self.d_model = d_model
self.d_ff = d_ff

self.num_enc_layers = num_enc_layers
self.num_dec_layers = num_dec_layers

# Dropout regularization: added in every sublayer before layer_norm(...) and
# applied to embedding + positional encoding.
self.drop_rate = drop_rate

# Label smoothing epsilon
self.ls_epsilon = ls_epsilon
self.use_label_smoothing = use_label_smoothing
self.pos_encoding_type = pos_encoding_type

# For computing the learning rate
self.warmup_steps = warmup_steps

self.config = dict(
num_heads=self.h,
d_model=self.d_model,
d_ff=self.d_ff,
num_enc_layers=self.num_enc_layers,
num_dec_layers=self.num_dec_layers,
drop_rate=self.drop_rate,
warmup_steps=self.warmup_steps,
ls_epsilon=self.ls_epsilon,
use_label_smoothing=self.use_label_smoothing,
pos_encoding_type=self.pos_encoding_type,
model_name=self.model_name,
tf_sess_config=self.tf_sess_config,
)
def forward(self, src, tgt, src_mask, tgt_mask): # 这里进行拼接,将encoder和decoder两大模块拼接在一起
enc_out = self.encoder(src, src_mask)
dec_out = self.decoder(enc_out, src_mask, tgt, tgt_mask)
return dec_out

Tranformer Encoder

image-20240102135835011
1
2
3
4
5
6
7
8
9
10
11
12
13
14
def clones(module, N):
"Produce N identical layers."
return nn.ModuleList([copy.deepcopy(module) for _ in range(N)])

class TransformerEncoder(nn.Module):
def __init__(self, encoder_layer, num_enc_layers) -> None:
self.num_enc_layers = num_enc_layers
self.encoder_layers = clones(encoder_layer,num_enc_layers) # 将encoder_layer复制6次

def forward(self, src, src_mask):
out = src
for layer in self.encoder_layers:
out = layer(out, src_mask)
return out

这里实现了一个clones帮助函数,我想过在这里用for循环,lilian在这里就是用的for循环:

1
2
3
4
5
out = inp  # now, (batch, seq_len, embed_size)
with tf.variable_scope(scope):
for i in range(self.num_enc_layers):
out = self.encoder_layer(out, input_mask, f'enc_{i}')
return out

注意这里的每一个encoder_layer的参数都是独立的,也就是有6份encoder_layer的参数需要训练,tensorflow为什么可行?是因为它这里使用了variable_scope的概念,上面的tensorflow实现每一次out和input_mask进来都是和不同的数值进行的运算。如果在pytorch中想实现这种方式,要先把encoder_layer复制六遍,每一次输入进来都拿不同的layer做运算。

encoder layer

接下来我们实现encoder layer中的细节部分,它包含两个sub-layer: 1) self-attention + Add&layer_Norm 2) position-wise feed forward + Add&layer_Norm

image-20240102135835011
1
2
3
4
5
6
7
8
9
10
11
12
13
14
15
16
17
18
19
20
21
22
23
24
25
26
27
28
29
30
31
32
class TransformerEncoderLayer(nn.Module):
"""
Args:
d_model: the number of expected features in the input (required).
nhead: the number of heads in the multiheadattention models (required).
dim_feedforward: the dimension of the feedforward network model (default=2048).
About:

"""
# One multi-head attention + one feed-forward
def __init__(self, d_model, n_head, dim_feedforward, dropout = 0.1) -> None:
super().__init__()
self.self_attn = MultiheadAttention(d_model, n_head)
self.norm_1 = nn.LayerNorm(d_model)
# Implementation of Feedforward model(Two linear transformation together with one dropout)
self.linear1 = nn.Linear(d_model, dim_feedforward, )
self.dropout = nn.Dropout(dropout)
self.linear2 = nn.Linear(dim_feedforward, d_model)
self.norm_2 = nn.LayerNorm(d_model)

def __ff_block(self, x):
# feed forward layer contains two linear
out = F.relu(self.linear1(x))
out = self.dropout(out)
out = self.linear2(out)

def forward(self, src, src_mask):
out = src
out = self.norm_1(out + self.self_attn(out, src_mask))# 这里在pytorch的官方实现中在self_attention后还加了一个dropout
out = self.norm_2(out + self.__ff_block(out))

return out

self attention

我一开始查阅的资料是illustrated-transformer, 这个博客内没有具体的实现。后来我参考的是lilian wen的tensorflow实现。在lilian的实现里对于multihead attention是这样写的:

1
2
3
4
5
6
7
8
9
10
11
12
13
14
15
16
17
18
19
20
21
22
23
24
25
26
27
28
29
30
31
32
33
34
35
36
37
def multihead_attention(self, query, memory=None, mask=None, scope='attn'):
"""
Args:
query (tf.tensor): of shape (batch, q_size, d_model)
memory (tf.tensor): of shape (batch, m_size, d_model)
mask (tf.tensor): shape (batch, q_size, k_size)

Returns:h
a tensor of shape (bs, q_size, d_model)
"""
if memory is None:
memory = query

with tf.variable_scope(scope):
# Linear project to d_model dimension: [batch, q_size/k_size, d_model]
Q = tf.layers.dense(query, self.d_model, activation=tf.nn.relu)
K = tf.layers.dense(memory, self.d_model, activation=tf.nn.relu)
V = tf.layers.dense(memory, self.d_model, activation=tf.nn.relu)

# Split the matrix to multiple heads and then concatenate to have a larger
# batch size: [h*batch, q_size/k_size, d_model/num_heads]
Q_split = tf.concat(tf.split(Q, self.h, axis=2), axis=0)
K_split = tf.concat(tf.split(K, self.h, axis=2), axis=0)
V_split = tf.concat(tf.split(V, self.h, axis=2), axis=0)
mask_split = tf.tile(mask, [self.h, 1, 1])

# Apply scaled dot product attention
out = self.scaled_dot_product_attention(Q_split, K_split, V_split, mask=mask_split)

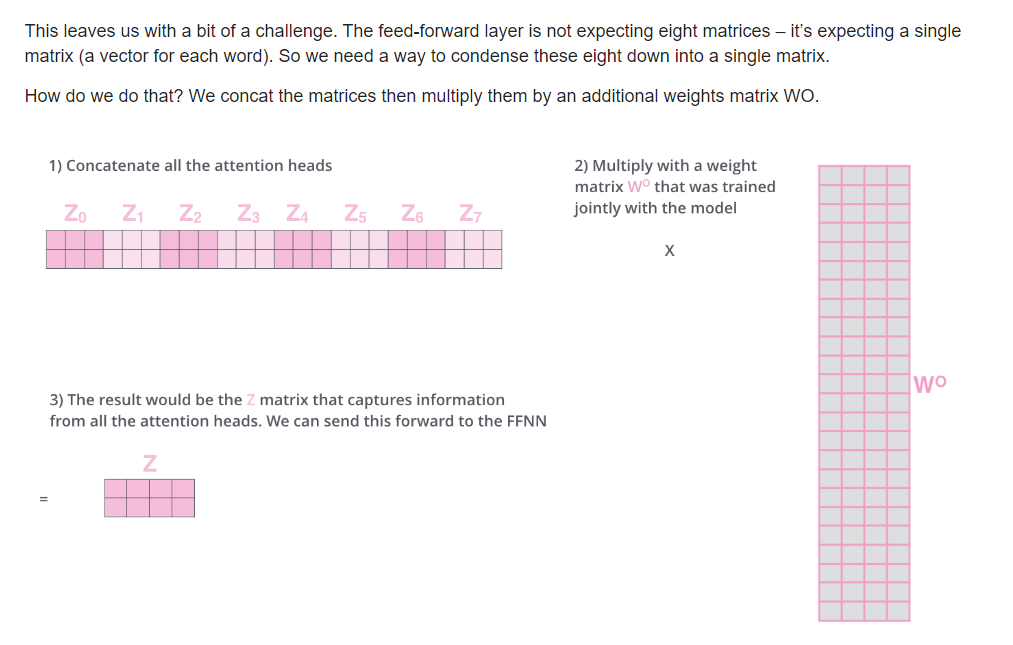
# Merge the multi-head back to the original shape
out = tf.concat(tf.split(out, self.h, axis=0), axis=2) # [bs, q_size, d_model]

# The final linear layer and dropout.
# out = tf.layers.dense(out, self.d_model)
# out = tf.layers.dropout(out, rate=self.drop_rate, training=self._is_training)

return out

以上的实现其实和博客内的内容有点相左,博客写的是:

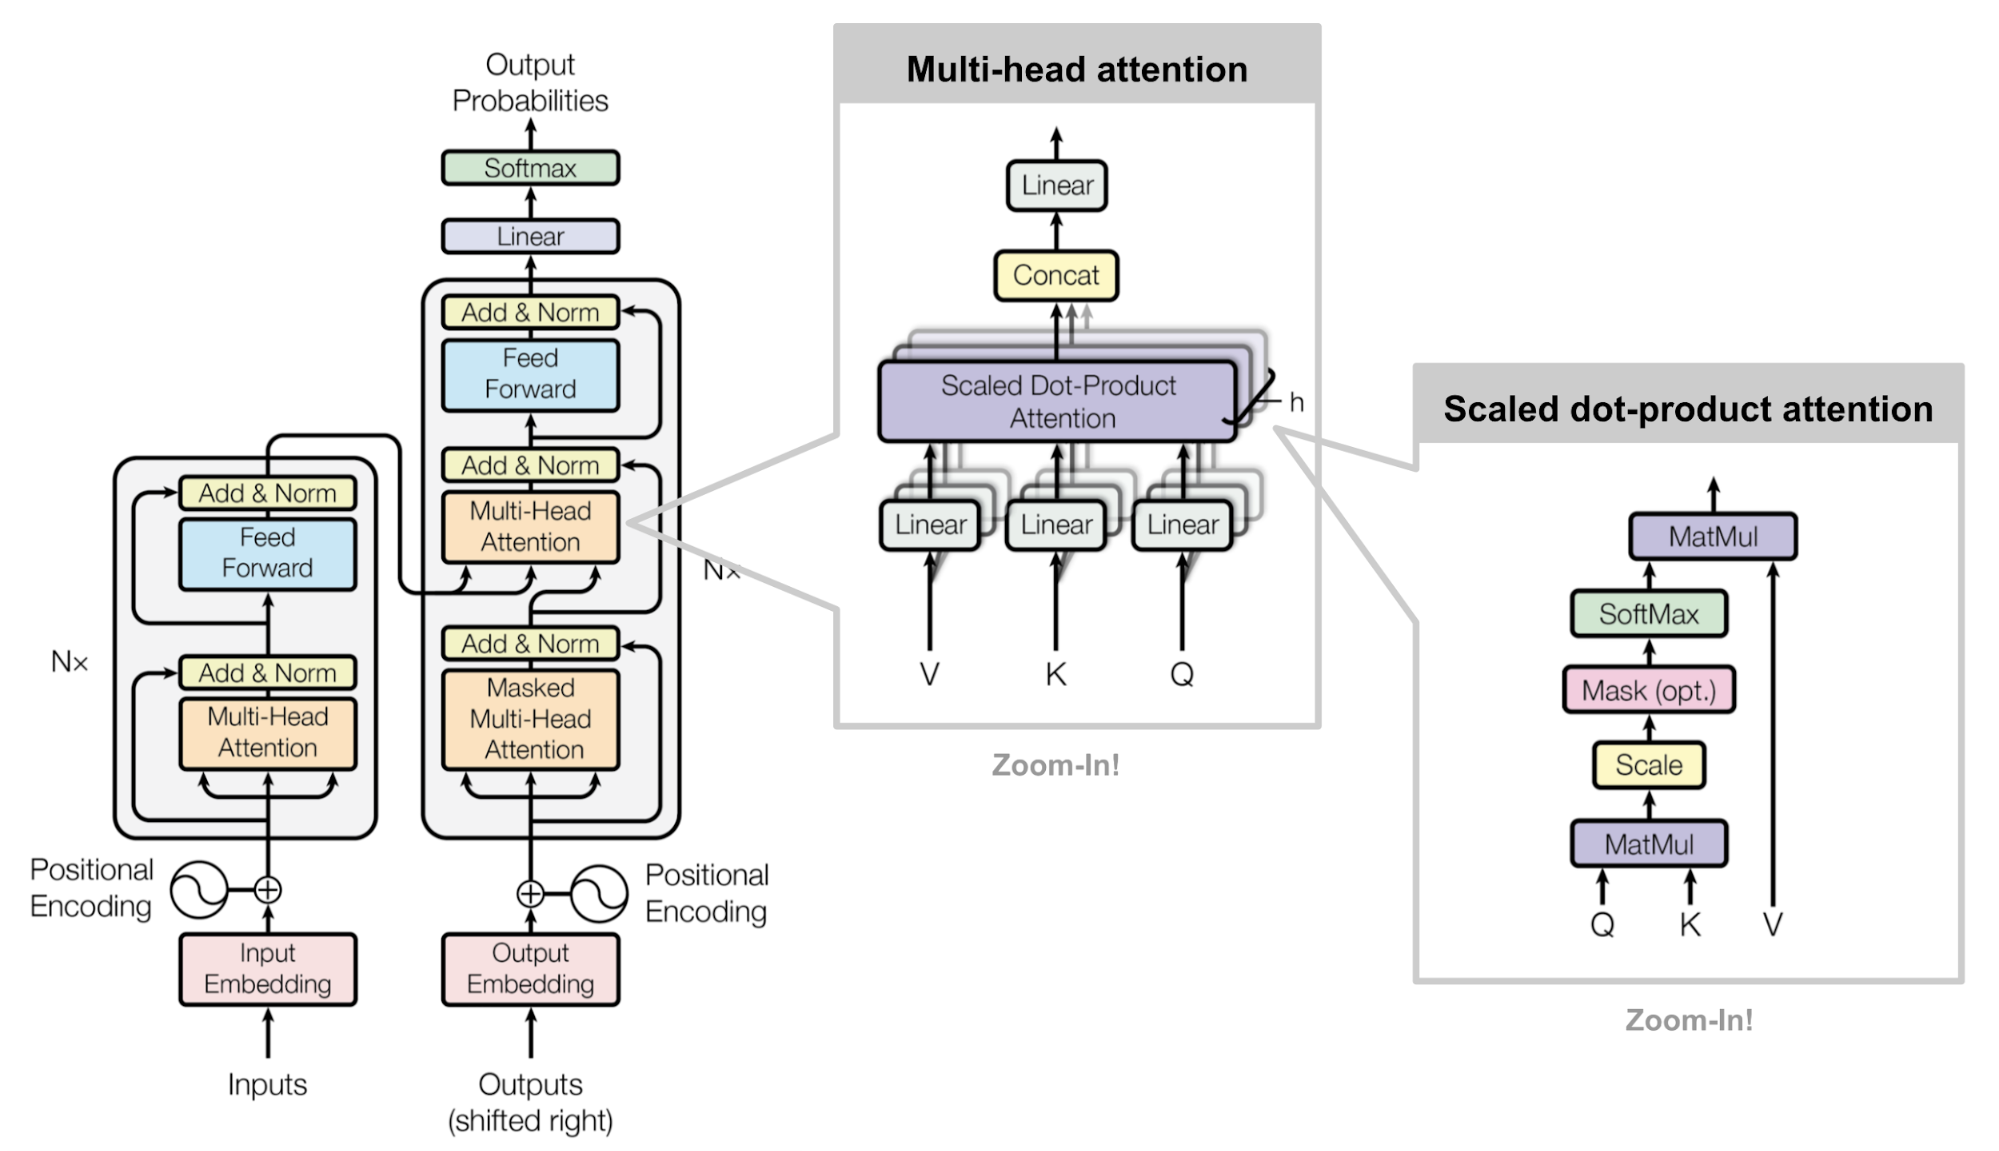
As we’ll see next, with multi-headed attention we have not only one, but multiple sets of Query/Key/Value weight matrices (the Transformer uses eight attention heads, so we end up with eight sets for each encoder/decoder). Each of these sets is randomly initialized. Then, after training, each set is used to project the input embeddings (or vectors from lower encoders/decoders) into a different representation subspace.

结合作者给出的图片:

image-20240104131802468

我一开始的理解是每一个head都有一份单独的W sets(WQ,WK,WV)。每一个head经过了scaled attention的计算

image-20240104132257007

得到的Z的shape都是(batch, seq_len, embeded_size),所以才会有WO这个线性变化(blog里说的):

image-20240104132406484

但我看完代码之后发现并不是我想的那样。我觉得这篇博客写的有点问题。后来又找到了一篇博客,能够解答我的疑问。它最重要的话是:

However, the important thing to understand is that this is a logical split only. The Query, Key, and Value are not physically split into separate matrices, one for each Attention head. A single data matrix is used for the Query, Key, and Value, respectively, with logically separate sections of the matrix for each Attention head. Similarly, there are not separate Linear layers, one for each Attention head. All the Attention heads share the same Linear layer but simply operate on their ‘own’ logical section of the data matrix.

这篇博客主要记录博主在探索meta开源的llama大模型,包括它的数据,training代码以及评测方法。之所以想记录下来,主要是因为llama的论文写的极其的细致,完美践行了开源这个词(感谢meta!),第二个原因是它的文档以及社区都很活跃,使用人群广泛,我们可以借助很多中文社区的复现情况去一探大公司在实现一个大模型时候的考量,以及思考它为什么会这样做。

之前写过一篇关于斯坦福的alpaca的代码的解析,后来看过很多关于微调大模型(supervised finetuning)的代码仓库,大家的实现思路基本上都可以追溯到alpaca的这份代码。

首先我会将所有我参考的资料罗列在前面,方便大家查找: - llama代码仓库 这个仓库是介绍如何下载llama模型 - llama "食谱" 一开始我想在上一个llama仓库中找到相关的train代码,找了半天发现根本没有。后来才发现meta官方将所有finetune(pretrain from scrach)的代码放在这个仓库,适合developer - Llama 2: Open Foundation and Fine-Tuned Chat Models llama2的research paper。强烈建议食用

中文社区的LLama的工作 - Chinese LLaMA Alpaca2

这个仓库同样有配套的文章Efficient and Effective Text Encoding for Chinese LLaMA and Alpaca

这个仓库的工作主要是两个:

  1. 扩充了llama原来的token,也就是中文的那部分
  2. 用新的中文数据在llama上进行了continue pretraining,并且发布了在instruction数据上的微调模型

研究思路很简单,在别人模型上继续预训练,并参照alpaca对预训练的模型进行instruction finetune让其具备follow instructions的能力。我们首先从这个Chinese LLaMA代码仓库看起。

Read more »