0%

本博客旨在记录自己在了解image classification这个术语computer vision的一个子任务中常见的模型。耳熟能详的就是ResNet,VGG,Inception,MobileNet, Efficientnet。每一个模型之间有什么区别,他们自身又有哪些变种,比如VGG,它拥有VGG16,VGG19等,ResNet又有很多,单是查看Tensorflow的官方文档就会发现在tf.keras.applications模块下,就有很多模型架构可选(也都有预训练参数)。整理这个博客的目的在于让自己对这些模型之间的差别有所了解,这样在不同的任务中才会知道使用什么样的模型架构来handle自己的数据。

在整理这篇博客的过程中,我也去搜了有没有image classification这个单任务上的review文章,文章都挺多的,筛选之后推荐这篇Review of Image Classification Algorithms Based on Convolutional Neural Networks.这篇文章主要是介绍基于CNN的一些模型,共有三个章节。重点是第二章节梳理了CNN-based的一些模型,包括本文想要coverVGGinceptionresnetmobilenet。重点关注图像分类算法的小伙伴可以通读一下这篇文章。

Review of Image Classification Algorithms Based on Convolutional Neural Networks第二章节目录

VGG

首次提出在2014年的paper

img

上图中包含13个卷积层和3个全连接层,是VGG16的结构。而VGG19包含了16个卷积层和3个全连接层:

img

VGG系列就是VGG16VGG19,两者的区别在于19用了更多的卷积层。Tensorflow也提供了这两个模型的黑盒子实现供大家使用。

ResNet

首次提出在2016年的paper,其中最重要的就是网络中的residual block:

img

在作者的原文中我们可以发现,文章中提出的Resnet是34层,也就是ResNet34。在具体实现的时候,作者在每一个卷积操作之后(激活函数之前)加上了batch Normalization。在Module: tf.keras.applications.resnetTensorflow applications resnet中现在只有ResNet101,152,50三个版本,其中ResNet50和ResNet34的区别在于:前者使用三个卷积一个block,后者是2个卷积一个block. ResNet50表现更优异。ResNet101和ResNet152在一个block内使用了更多的卷积layer。

以上所说的都是resnet v1,后来同一个作者又发表了Identity Mappings in Deep Residual Networks,提出了ResNet v2。同样我们在tensorflow中也可以看到模块Module: tf.keras.applications.resnet_v2,同样的也有50,101,152三个版本的model。

v1和v2的区别在于:

ResNet v1 and ResNet v2

以上只是概念上的解释,看代码会更合适一点,其中Deep Residual Learning for Image Recognition文章中也给出了34,50,101,152等几个模型在实现中注意的细节:

image-20230206153053177

ResNet34 V1中,一个resnet block是由两个卷积layer组成的,同时它和V2的一个区别就在于X进来后就先进行卷积运算,也就是上图中的weight

1
2
3
4
5
6
7
8
9
10
11
12
13
14
15
16
17
18
19
20
21
22
23
24
25
26
27
28
29
30
31
32
33
34
35
36
37
38
39
40
41
42
43
44
45
46
47
48
49
50
51
52
53
54
55
56
57
58
59
60
61
62
63
64
65
66
67
68
69
70
71
72
73
74
75
76
77
78
79
80
81
82
83
84
85
86
87
88
89
90
91
92
93
94
95
96
97
98
99
100
101
102
103
104
105
106
107
import tensorflow as tf
from tensorflow import keras
from keras.activations import relu
from tensorflow.keras.layers import *
from tensorflow.keras import Model
from tensorflow.keras import layers as Layers

class ResBlock(Model):
def __init__(self, channels, stride=1):
super(ResBlock, self).__init__(name='ResBlock')
self.flag = (stride != 1)
self.conv1 = Conv2D(channels, 3, stride, padding='same')
self.bn1 = BatchNormalization()
self.conv2 = Conv2D(channels, 3, padding='same')
self.bn2 = BatchNormalization()
self.relu = ReLU()
if self.flag:
self.bn3 = BatchNormalization()
self.conv3 = Conv2D(channels, 1, stride)

def call(self, x):
x1 = self.conv1(x)
x1 = self.bn1(x1)
x1 = self.relu(x1)
x1 = self.conv2(x1)
x1 = self.bn2(x1)
if self.flag:
x = self.conv3(x)
x = self.bn3(x)
x1 = Layers.add([x, x1])
x1 = self.relu(x1)
return x1


class ResNet34(Model):
def __init__(self):
super(ResNet34, self).__init__(name='ResNet34')
self.conv1 = Conv2D(64, 7, 2, padding='same')
self.bn = BatchNormalization()
self.relu = ReLU()
self.mp1 = MaxPooling2D(3, 2)

self.conv2_1 = ResBlock(64)
self.conv2_2 = ResBlock(64)
self.conv2_3 = ResBlock(64)

self.conv3_1 = ResBlock(128, 2)
self.conv3_2 = ResBlock(128)
self.conv3_3 = ResBlock(128)
self.conv3_4 = ResBlock(128)

self.conv4_1 = ResBlock(256, 2)
self.conv4_2 = ResBlock(256)
self.conv4_3 = ResBlock(256)
self.conv4_4 = ResBlock(256)
self.conv4_5 = ResBlock(256)
self.conv4_6 = ResBlock(256)

self.conv5_1 = ResBlock(512, 2)
self.conv5_2 = ResBlock(512)
self.conv5_3 = ResBlock(512)

self.pool = GlobalAveragePooling2D()
self.fc1 = Dense(512, activation='relu')
self.dp1 = Dropout(0.5)
self.fc2 = Dense(512, activation='relu')
self.dp2 = Dropout(0.5)
self.fc3 = Dense(64)

def call(self, x):
x = self.conv1(x)
x = self.bn(x)
x = self.relu(x)
x = self.mp1(x)

x = self.conv2_1(x)
x = self.conv2_2(x)
x = self.conv2_3(x)

x = self.conv3_1(x)
x = self.conv3_2(x)
x = self.conv3_3(x)
x = self.conv3_4(x)

x = self.conv4_1(x)
x = self.conv4_2(x)
x = self.conv4_3(x)
x = self.conv4_4(x)
x = self.conv4_5(x)
x = self.conv4_6(x)

x = self.conv5_1(x)
x = self.conv5_2(x)
x = self.conv5_3(x)

x = self.pool(x)
x = self.fc1(x)
x = self.dp1(x)
x = self.fc2(x)
x = self.dp2(x)
x = self.fc3(x)
return x


model = ResNet34()
model.build(input_shape=(1, 480, 480, 3))
model.summary()

Inception

已经有不少博客在科普Inception系列模型的区别A Simple Guide to the Versions of the Inception Network

首先提出该模型的是2014年的Going deeper with convolutions Inception V1(GoogleNet),然后又分别有了好几个变体:Inception V2,Inception V3,Inception V4Inception-ResNet-v2。和ResNet一样,Inception网络中一个重要的moduleInception Module

Inception Module

其中这些Network中被广泛使用的是Inception_v3Inception-ResNet-v2.

MobileNet

The idea behind MobileNet is to use depthwise separable convolutions to build loghter deep neural networks. In regular convolutional layer, the convolution kernel or filter is applied to all of the channels of the input image, by doing weighted sum of the input pixels with the filter and then slides to the next input pixels across the images.MobileNet uses this regular convolution only in the first layer. The next layers are the depthwise separable convolutions which are the combination of the depthwise and pointwise convolution. The depthwise convolution does the convolution on each channel separately. If the image has three channels, therefore, the output image also has three channels. This depthwise convolution is used to filter the input channels. The next step is the pointwise convolution, which is similar to the regular convolution but with a 1x1 filter. The purpose of pointwise convolution is to merge the output channels of the depthwise convolution to create new features. By doing so, the computational work needed to be done is less than the regular convolutional networks.

引用自the-differences-between-inception-resnet-and-mobilenet

MobileNet使用了两种卷积形式,depthwisepointwise,后者就是我们常见的卷积操作,只是使用的是1✖1的卷积核,input image有多少个channelfilter就会延展为几个channel,比如输入进来的channel数是3,那么一个3*3大小的filter就会extend成3✖3✖3的一个立方体,然后这27个数分别禹输入image对应的区域做乘积之后相加取和。但是depthwise卷积是对每一个channel分别做卷积,如果输入图片有三个channel,那么输出的也会是三个channel。如图:

depthwise convolution

tensorflow中有DepthwiseConv2D这个layer,它对于depthwise convolution的解释是:

Depthwise convolution is a type of convolution in which each input channel is convolved with a different kernel (called a depthwise kernel). You can understand depthwise convolution as the first step in a depthwise separable convolution.

MobileNetV2主要引进了Inverted residualslinear bottlenecks去解决在depthwise卷积操作中卷积核的参数往往是0的问题

other topics

在阅读Review of Image Classification Algorithms Based on Convolutional Neural Networks的最后一章节时,作者不仅介绍了现在research和industry领域用的比较多的image classification的模型,也给出了各个模型在image-net数据集上的accuracy。在总结章,作者还提出了一些结论性的发现,我觉得蛮收益的,将文章的观点整理在这里。

  1. 2012年到2017年主要提供了日后用于分类的basic CNN模型架构,这期间的模型架构有2012的alexnet,2014年的vgg,2014年的inception,2015年的resnet,2017年提出了attention加cnn的架构
  2. attention加入到cnn之后形成了新的模型,也因此提高了模型的performance。现在很多模型会将SE block嵌入到模型架构中去,我查了下这个SE block是SEnet中的一个block,squeeze and excitation block。SEnet是在2017年提出的,这个知识点待补充
  3. 超参数的选择对于CNN网络的performance影响很大,很多的工作在着力于减少超参数的个数以及replace them with other composite coefficients。
  4. 手动设计一个performance很好的网络往往需要很多effort,NAS search (neural architecture search)可以让这个过程变得更简单
  5. 想要提升模型的performance,不仅仅需要将关注力放在模型架构的设计上,data augmentation,transfer learning,training strategies也可以帮助我们提高模型的准确度。在transfer learning上,paper: Large Scale Learning of General Visual Representations for Transfer 总结了一些在不同的task上如何利用transfer learning取得很好的performance的办法。

CNN model 还面临的挑战:

  1. lightweight models比如mobileNet系列的轻量级模型往往需要牺牲accuracy来提高efficiency。未来在embedded系统上,CNN的运行效率值得去explore
  2. cnn模型在semi-supervised和unsupervised上的发挥不如NLP领域。

future directions:

  1. 重视vision transformer. 如何将卷积和transformer有效结合起来是当前的一个热点。目前的SOTA network是 CoAtNet,在image net数据集上的accuracy是90.88,确实是目前在image net数据集上performance最高的模型架构。值得读一下,mark!
  2. 有一些关于CNN的传统技术可能会成为阻碍CNN发展的重要因素,诸如:activation function的选择,dropout,batch normalization。

SENet 2017

原文 SEnet,是由自动驾驶公司Momenta在2017年公布的一种全新的图像识别结构,它通过对特征通道间的相关性进行建模,把重要的特征进行强化来提升准确率。这个结构是2017 ILSVR竞赛的冠军,top5的错误率达到了2.251%,比2016年的第一名还要低25%,可谓提升巨大。

CoAtNet

Reference

  1. Architecture comparison of AlexNet, VGGNet, ResNet, Inception, DenseNet
  2. VGGNet Architecture Explained
  3. resnet-residual-neural-network Resnet系列网络架构的区别

GRU

GRU

其实单看输出,GRU的输出是和简单的RNN一样的,都只有一个hidden_state。所以在tensorflow中它的输出其实和RNN layer一样:

1
2
3
4
5
6
7
import tensorflow as tf

inputs = tf.random.normal([32, 10, 8])
gru = tf.keras.layers.GRU(4)
output = gru(inputs)
print(output.shape)
>> (32, 4)

其中有两个可以传递给GRU的参数,一个是return_state,一个是return_sequence。两个值都是bool类型。如果单独传递return_sequence=True,那么输出将只有一个值,也就是每一个时间步的序列:

1
2
3
4
gru = tf.keras.layers.GRU(4, return_sequences=True)
output = gru(inputs)
print(output.shape)
>> (32, 10, 4)

如果单独传递return_state=True,那么输出将会是两个值,可以仔细看官方文档中的说明是Boolean. Whether to return the last state in addition to the output. Default:False.`也就是output和最后的hidden_state会一起输出,并且output会等于final_state:

1
2
3
4
5
6
gru = tf.keras.layers.GRU(4, return_state=True)
output, final_state = gru(inputs)
print(output.shape)
print(final_state.shape) # output=final_state
>> (32, 4)
>> (32, 4)

如果单独传递return_sequences=True,LSTM将只返回整个序列!

1
2
3
4
5
lstm = tf.keras.layers.LSTM(4,return_sequences=True)
inputs = tf.random.normal([32, 10, 8])
whole_seq_output = lstm(inputs)
print(whole_seq_output.shape)
>> (32, 10, 4)

那如果两个值都设置成True呢?这将返回两个输出,第一个输出是整个序列,第二个输出是最终的state。注意这里并没有output了,因为output其实是sequence中最后一个序列sequence[:,-1,:]

1
2
3
4
5
6
gru = tf.keras.layers.GRU(4, return_sequences=True, return_state=True)
whole_sequence_output, final_state = gru(inputs)
print(whole_sequence_output.shape)
print(final_state.shape)
>> (32, 10, 4)
(32, 4)

LSTM

轮到LSTM,因为架构上跟GRU有点区别,所以在返回结果上就多了一个carry_state.

LSTM

想要了解LSTM的具体计算,参考博客

在tensorflow中一样有return_state和return_sequences:

1
2
3
4
5
inputs = tf.random.normal([32, 10, 8])
lstm = tf.keras.layers.LSTM(4)
output = lstm(inputs)
print(output.shape)
>> (32, 4)

如果单独传递return_state,这里和GRU不一样的地方在于lstm有两个state,一个是memory_state一个是carry_state

1
2
3
4
5
6
7
8
lstm = tf.keras.layers.LSTM(4,return_state=True)
output, final_memory_state, final_carry_state = lstm(inputs)
print(output.shape)
print(final_memory_state.shape) # final_memory_state=output
print(final_carry_state.shape)
>> (32, 4)
>> (32, 4)
>> (32, 4)

如果同时设置True

1
2
3
4
5
6
7
8
lstm = tf.keras.layers.LSTM(4,return_sequences=True,return_state=True)
whole_seq_output, final_memory_state, final_carry_state = lstm(inputs)
print(whole_seq_output.shape)
print(final_memory_state.shape) # final_memory_state=whole_seq_output[:,-1,:]
print(final_carry_state.shape)
>> (32, 10, 4)
>> (32, 4)
>> (32, 4)

GRU vs LSTM

至于我们在训练模型的时候选择哪一个cell作为RNN的cell,cs224n课程给出的答案是:

Researchers have proposed many gated RNN variants, but LSTM and GRU are the most widely-used.

Rule of thumb: LSTM is a good default choice (especially if your data has particularly long dependencies, or you have lots of training data); Switch to GRUs for speed and fewer parameters.

LSTM doesn’t guarantee that there is no vanishing/exploding gradient, but it does provide an easier way for the model to learn long-distance dependencies.

在2023年的今天,lstm也不再是研究者青睐的对象,最火的模型变成了Transformer:
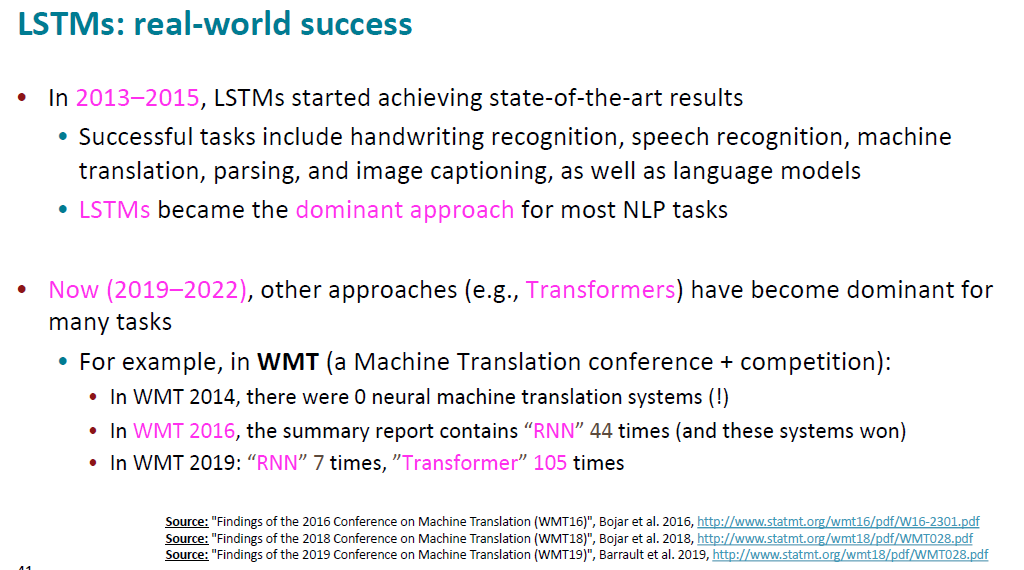
image-20230313095438649

这里也贴出2022年的最新WMT的结果

最近在object detection任务上读这几篇文章,见识到神仙打架。一开始我只是关注image segmentation的任务,其中instance segmentation任务中Mask-RCNN是其中比较火的一个model,所以就把跟这个模型相关的几个模型都找出来看了看。这里想记录下这几天看这几篇论文的心得体会,如果有写的不正确的地方,欢迎批评指正。

其实去仔细看这几篇论文很有意思,梳理一下时间线就是:

  1. 2014年Girshick提出了RCNN,用于解决accurate object detection 和 semantic segmentation。该模型有一个drawbacks是每次一张图片输入进来,需要产生~2000个region proposals,这些region的大小都是不一致的,但我们对图片进行分类的下游网络都是需要fixed size的图片,那怎么办呢?作者提出使用wraped方法,具体可以参考作者的论文。总之最终我们输入到SVM也就是分类器的region图片大小都是一致的。

  2. 为了解决每次输入网络的图片大小怎么样才能变成fixed size的vector,2015年he kaiming提出了SPP(spatial pyramid pooling),跟前者RCNN不一样的地方在于:1) 将region proposal的方法用在了图片输入cnn网络得到的feature map上,2)从feature map选择出来的region proposal不还是不一样大小么?作者没有使用wrap的方法,而是提出了一个SPP layer,这个layer可以接受任何大小的图片,最终都会转化成一个fixed size的向量,这样就可以轻松输入进SVM或者Dense layer进行分类了。

  3. 收到SPP的启发,Girshick在2015年提出了Fast-RCNN,将SPP layer重新替换成ROI Pooling,经过ROI pooling,输出的并不是SPP layer输出的金字塔式的向量了,而是只有一个。 参考博客

  4. 经过前一轮的battle,虽然各自的模型都提出了自己的独特方法,但是无论是SPP Net还是Fast-RCNN都没有提出在选择ROI(region of interest)的方法。2016年He Kaiming再次强势入场,提出了产生region proposal的方法,它使用了一个单独的CNN网络来获取region proposal.得到了这些proposal之后再将他们传递给Roi Pooling layer,后面的过程和fast RCNN一致。 这篇Faster-RCNN的方法作者中有he kaiming和Girshick,这里致敬下sun jian,感谢为computer vision领域贡献的灵感和创造。

Mask-RCNN

Mask-RCNN是Region-based CNN系列中的一个算法,用于解决instance segmentation的问题,instance segmentation的难点在于我们不仅要做object detection,而且需要将object的准确轮廓给识别出来,同时做出分类这是什么object。在Mask-RCNN

中,related work一章节对RCNN这一系列的模型做了准确概括,建议大家读原文:

The Region-based CNN (R-CNN) approach [13] to bounding-box object detection is to attend to a manageable number of candidate object regions [42, 20] and evaluate convolutional networks [25, 24] independently on each RoI. R-CNN was extended [18, 12] to allow attending to RoIs on feature maps using RoIPool, leading to fast speed and better accuracy. Faster R-CNN [36] advanced this stream by learning the attention mechanism with a Region Proposal Network (RPN). Faster R-CNN is flexible and robust to many follow-up improvements (e.g., [38, 27, 21]), and is the current leading framework in several benchmarks.

在Mask-RCNN的文章中提出了一种新的ROIAlign Layer,主要是为了解决Faster-Rcnn的网络中ROI pooling layer的问题。在此补充下ROI pooling是怎么将不同size的ROI(region of interest)都变成fixed-size的feature map的:

ROI Pooling Layer

上图是将5*4大小的ROI变成了2✖2大小的feature map。这种方式带来的影响就是可能在提取的extracted features和ROI之间造成misalignments。但是这种misalignments并不会在faster-rcnn中对分类造成很大的影响,但如果要用这个ROI做segmentation的话就可能会造成巨大的影响,因此作者提出了一个ROIAlign Layer。

如果有小伙伴想对照code看这篇paper,可以参考tensorflow实现。如果你对pytorch更熟悉可以参考paper中给出的官方github地址的实现。有一篇博客详细介绍了tensorlfow的实现,参见blog

在MaskRCNN中使用了faster-rcnn中提出的RPN来产生ROI,然后才使用上面提到的ROI Algin。RPN的具体细节参见fatser-rcnn原文和本博客的第二章节

RPN(Region Proposal Network)

RPN 是在faster-rcnn中提出来的网络,主要是为了解决在rcnn和fast-rcnn两个前置模型中产生ROI的耗时问题,之前产生ROI主要是依靠Selected Search。在读mask-rcnn的paper时发现这个网络的细节不甚了解,这里补充记录一下。感兴趣的朋友可以阅读paper的第3.2节。

RPN在output长方体的ROI的同时,也会给每一个ROI产生一个Objectness score。看原文的时候作者是以sliding window的方式来讲解的,一开始看的有点懵。但其实就是卷积层的计算过程的拆解,我们先按照作者的思路来看RPN做了什么。

faster-Rcnn

RPN的输入是经过一系列卷积层之后的feature map,在这个map上,我们在上面再做一些运算:

RPN network

针对一个window(n✖n),RPN做的就是将这个window映射到一个低维度的feature上,图上是256维的向量,然后我们再接两个dense layer,一个用于预测box,一个用于做分类。k的意思是在每一个sliding window上我们都维护了k个anchor,这个概念和yolo里一致。所以在每一个sliding-window上我们都可以得出来4k个box和2k个分类结果(是否有object的概率),这个anchor box是和sliding-window的中心点绑定的,所以如果RPN的输入是一个W×H的feature map,那么我们就会有W×H×k个anchors。

那么我们知道RPN是怎么计算的了,然后在训练阶段还有一些tricks。作者对每一个anchor都赋予了一个class label,赋予positive的anchor为 1) anchor和 groud truth的box有最高的IOU 2) 如果anchor与groud truth的box的IOU大于0.7。这两种anchor都会被赋予positive的标签,也就是代表它里面有object。对于哪些和任何groud truth box的IOU都小于0.3的anchor,赋予negtive的标签。在为RPN产生训练数据时,对于所有的anchors都有一个class label,也就是它里面是否包含object。对于box的训练数据的处理有一点不一样的地方。可以参考tensorflow实现,在mrcnn/model.pybuild_rpn_target函数中:

1
2
3
4
# RPN Match: 1 = positive anchor, -1 = negative anchor, 0 = neutral
rpn_match = np.zeros([anchors.shape[0]], dtype=np.int32)
# RPN bounding boxes: [max anchors per image, (dy, dx, log(dh), log(dw))]
rpn_bbox = np.zeros((config.RPN_TRAIN_ANCHORS_PER_IMAGE, 4))

rpn_bbox的数量是提前设定好的,也就是不是对每一个anchor都会有一个box来对应,对于那些标记为positive的anchor box才会有bbox的target。

1
2
3
4
5
6
7
# Generate RPN trainig targets
# target_rpn_match is 1 for positive anchors, -1 for negative anchors
# and 0 for neutral anchors.
target_rpn_match, target_rpn_bbox = modellib.build_rpn_targets(
image.shape, model.anchors, gt_class_id, gt_bbox, model.config)
log("target_rpn_match", target_rpn_match)
log("target_rpn_bbox", target_rpn_bbox)

输出为:

1
2
target_rpn_match         shape: (65472,)              min:   -1.00000  max:    1.00000
target_rpn_bbox shape: (256, 4) min: -5.19860 max: 2.59641

从上面可以看出,在全局变量设置中设置的是每一张图片最多有256个anchors,所以产生的rpn_bbox shape就是(256,4),而用于RPN训练的class label是全部的anchors的分类label。进一步的我们可以查看其中一张图片的anchors:

1
2
3
4
5
6
7
8
9
10
11
12
13
14
15
positive_anchor_ix = np.where(target_rpn_match[:] == 1)[0]
negative_anchor_ix = np.where(target_rpn_match[:] == -1)[0]
neutral_anchor_ix = np.where(target_rpn_match[:] == 0)[0]
positive_anchors = model.anchors[positive_anchor_ix]
negative_anchors = model.anchors[negative_anchor_ix]
neutral_anchors = model.anchors[neutral_anchor_ix]
log("positive_anchors", positive_anchors)
log("negative_anchors", negative_anchors)
log("neutral anchors", neutral_anchors)

# Apply refinement deltas to positive anchors
refined_anchors = utils.apply_box_deltas(
positive_anchors,
target_rpn_bbox[:positive_anchors.shape[0]] * model.config.RPN_BBOX_STD_DEV)
log("refined_anchors", refined_anchors, )

输出:

1
2
3
4
positive_anchors         shape: (14, 4)               min:    5.49033  max:  973.25483
negative_anchors shape: (242, 4) min: -22.62742 max: 1038.62742
neutral anchors shape: (65216, 4) min: -362.03867 max: 1258.03867
refined_anchors shape: (14, 4) min: 0.00000 max: 1023.99994

即便是有65472个anchors,但其实正负anchor所占比重很小,大多数是neutral的anchor。其中对于positive的anchor,我们拥有在他们的bbox上refine过的box。

positive anchor

上图中虚线画出来的是positive anchor,实线框出来的是在这些anchor上refine过的box。

在训练阶段,计算loss时,对于regression loss,模型只会计算postive anchors的regression loss,也就是只计算那些被打上positive标签的anchor预测的box与groud-truth box的回归loss。如果一个anchor,它的class label在anatation阶段就是negtive的,模型并不会将它预测出来的box和ground-truth box进行比较,他们的loss不会被计算进总的Loss。

关于如何训练的问题,在Faster-Rcnn的文章中给出了三种训练的算法,第一种也是文中采用的方法就是:1. alternating training : 先把RPN单独训练,然后使用RPN产生的proposals去训练fast r-cnn. 然后将fine-tune过的RPN作为初始参数,然后再去产生proposal,再去训练fast rcnn. 具体来说就是4步:

  1. 单独train RPN : 用ImageNet pre-trained 参数做初始化,然后在region proposal这个task上fine tune
  2. 利用第一步产生的proposal训练Fast-Rcnn,也就是架构图中的最上面一部分,该网络也会使用ImageNet pre-trained 参数做初始化。注意一直到这一步,两个网络都没有share任何卷积layers
  3. 第三步我们使用detector的network去初始化RPN,同时fix住最下面的卷积层,也就是两个网络共享的那些卷积层。这一步骤单独fine-tune RPN的layers。
  4. 最后一步,fine-tune Fast-RCNN的unique的layers。